Saturday, April 26, 2014

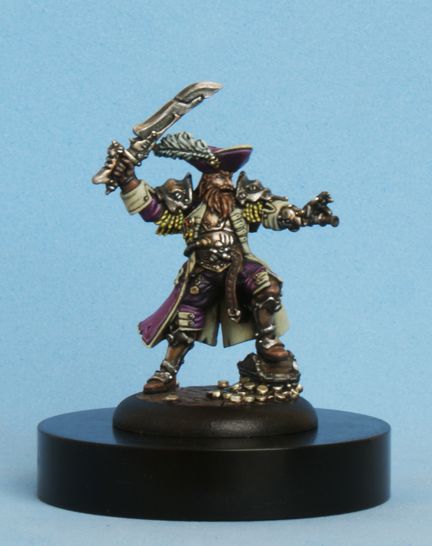
Painting: Captain Bartolo Montador, aka Broadsides Bart.

Hey everybody.

For those who are not familiar with this sculpt, he is one of the Mercenary Pirates from Privateer Press' Warmachine game. In 2012, I was asked to paint a mini for the Clash for a Cure charity auction, raising money for Cancer research. As it is a good cause, and since I had never painted a pirate before, I jumped at the chance to paint this guy.


As usual, I used mostly P3 paints on this guy. These paints came out just after I stopped painting for the Studio, and I have been in love with them from day 1. Before these paints were released, we did all of our, now standard, studio colors using custom mixes of Citadel paints, concocted by Mike McVey. For instance, the Menoth colors Sanguinary Base, and Sanguinary Highlight, were originally a mix of Dark Angels Green and Scab Red. To highlight, some Bleached Bone was added to the mix.

Now that I have an "official" line of paints to work with, I really enjoy recreating the studio schemes, and then giving them my own little twist. In this case, my own little twist was to add some texture to the coat and hat, a wash of Battlefield Brown mixed with Coal Black on all the parts of the mini, and using Underbelly Blue in most of the highlights. This ties all of the different colors together in a harmonious way. It doesn't show up in the photos, but in hand, this wash and highlight system gave an interesting tone to all of the colors.

To start, I undercoated the mini black, as usual. I feel that a black undercoat gives my colors a boldness that I really like. I am not a subtle painter, as my influences are comic book and tattoo line art.

The coat and hat where given a basecoat of P3 Beaten Purple. This was shaded with a mix of Beaten Purple and P3 Coal Black, at a 2-1 ratio. Next, I hit this with a wash of P3 Battlefield Brown and Coal Black, at a 1-1 ration thinned with some water. This tied the two layers together. The highlights started with an equal mix of Beaten Purple and P3 Menoth Sanguine Highlight. A glaze of thinned Beaten Purple tones down the slight pink color of the highlight mix. The final highlights are an equal mix of Beaten Purple and P3 Underbelly blue, once again, blended in with the Beaten Purple glaze.


Some of the final highlights on the coat and hat were painted in a cross-hatch pattern, to show a little bit of wear and tear, and give some texture. My first attempt didn't really work, because my lines were too thick, so I had to do them over again. Very fine hatch marks look way better. It turned out alright for a first time using this technique, but I can do better next time.


The inside of the coat was painted in a much lighter, contrasting, color. It started with a basecoat of Battlefield Brown, and then a layer of P3 Gun Corps Brown. This gave me a nice solid base to work up from. The midtone is P3 Hammerfall Khaki.This is then slathered with the wash of equal parts Coal Black and Battlefield Brown. I cleaned things up with the Hammerfall Khaki, and then layered on the first highlight of P3 Thrall Flesh. This is like using a bone color, but with a green undertone. The Thrall flesh was given a glaze of my wash mix, and then came the final highlights, an equal mix of Thrall Flesh and P3 Underbelly Blue.

The pants are painted in a much darker purple than the coat and hat, though I used the same colors. Since there was a lot less surface to cover, I started with the dark mix of Beaten Purple and Coal Black, at 2-1. This was shaded with a 1-1 mix of BP and CB, then I started picking out the folds with pure Beaten Purple. The first highlights are done with  mix of Beaten Purple and Sanguine Highlight, first at a 2-1 ratio, and then at a 1-2 ratio. These were knocked back a bit with the wash mix. Final highlights are an equal mix of Beaten Purple and Underbelly Blue, which is then toned down with a glaze of thinned Beaten Purple.

The boots, belt, and glove were basecoated with Battlefield Brown. The first highlight was an equal mix of BB and Idrian Flesh, followed by a second highlight of pure Idrian Flesh. This was then shaded with the wash mix, and cleaned up with pure Idrian Flesh again. The final highlights are an equal mix of Idrian Flesh and Underbelly Blue.

The face, as always, with  basecoat of Battlefield Brown. This is followed by a solid layer of P3 Khardic Flesh. I start to pick out the raised areas with P3 Midlund Flesh.I shade with a thinned wash of P3 Thornwood Green, and then give some life to the skin with a thinned glaze of P3 Skorne Red. The first highlights are an equal mix of Midlund Flesh and P3 Ryn Flesh. This is blended in with another gaze of Skorne Red, and finished with a highlight of pure Ryn Flesh. I was careful to keep the upper part of the face, under the hat, darker than the nose and cheeks, so didn't hit the forehead with the pure Ryn flesh. This creates a bit more realistic look, with the hat shading the face.

The hair and beard also got a basecoat of Battlefield Brown. This was shaded with the Battlefield Brown and Coal Black wash mix, and then all of the raised bits were painted with an equal mix of BB and P3 Bloodstone. This was followed by a layer of pure Bloodstone, which pretty much covered everything but the shading, giving him a ginger look. The first highlights are a mix of Bloodstone and Thrall Flesh at a 2-1 ratio. I began to pick out some of the shape and texture with a 2-1 mix of Bloodstone and Underbelly Blue, the a 1-2 mix of the same. This was toned down with a thinned glaze of Bloodstone, and the final little bright spots were done with pure Underbelly Blue. We now have a ginger pirate.

The golden tassels on the coat are Based with Battlefield Brown, followed by a solid coat of P3 Gun Corps Brown. I started to pick out the ridges with P3 Rucksack Tan, and then an equal mix of P3 Jack Bone and P3 Cygnar Yellow. Next, the ridges get a layer of pure Cygnus Yellow, and the final highlights are a mix of P3 Morrow White and Cygnus Yellow, at a 2-1 ratio.

The feather in Bart's cap was given a basecoat of Greatcoat Grey, followed by a heavy coat of the ws mix to pick out the detail. This was cleaned up with greatcoat Grey, and then the detail is picked out with P3 Trollblood Highlight. Next came a layer of Underbelly Blue, and the final highlights are a 2-1 mix of Morrow White and Underbelly Blue.


There are three different colors of metal on Bart, steel, gold, and brass.

For the steel, I start with a solid layer of P3 Pig Iron. After a liberal amount of the wash mix, I start picking out highlights with 1-1 mix of Pig Iron and P3 Cold Steel. Highlights are built up with a layer of pure Cold Steel, and then knocked back with the wash mix. The next layer is a 1-1 mix of Cold Steel and Vallejo Air Aluminium, followed by a thinned layer of the wash. Final highlights are pure VA Aluminium.

The golds start with a basecoat of Battlefield Brown, and then an equal mix of Battlefield Brown and P3 Rhulic Gold. This lays down a nice solid base for a layer of pure Rhulic Gold. This is then shaded with the wash mix. After a little clean-up with pure Rhulic Gold, I start to highlight with a 1-1 mix of Rhulic Gold and Vallejo Air Gold. The final highlight, on the bright spots, is pure VA Aluminium.

The brass, like the gold, starts with a layer of Battlefield Brown, followed by an equal mix of Battlefield Brown and P3 Brass Balls. Next is a layer of pure Brass Balls, and then the wash mix to shade. This is highlighted with Brass Balls mixed with VA Aluminium, toned down with some thinned wash, and finished with some spots of pure VA Aluminium.


The glow in the furnace of Bart's steam-powered armor is just a quick few layers using the same colors as the gem. Sanguine Base, Skorne Red, Khador Red Base, and Heartfire. The spaces were so small, and forgiving, it was just a matter of layering one on top of the other.

Any random straps holding the armor, or tubing, is based with P3 Thamar. This is highlighted with a quick succession of Greatcoat Grey, then P3 Cryx Bane Highlight, and finished with Trollblood Highlight.

The gem is painted red to stand out from all the purple. The basecoat is P3 Sanguine Base. The bottom half of the gem gets a curved streak of P3 Skorne Red, followed by a fine line of P3 Khador Red Base, and an even finer line of P3 Heartfire. The top quarter of the gem gets a dot of Thamar Black, and is finished with a fine dot of Morrow White.

The treasure chest that Bart stands on was given a basecoat of Battlefield Brown, and the slats were picked out with a layer of pure Bloodstone, and everything was shaded with a liberal coat of the wash mix. The slats are picked out again, but this time with an equal mix of Battlefield Brown and Bloodstone. I started to add some wood grain with pure Bloodstone, and then these lines were highlighted with an equal mix of Bloodstone and Underbelly Blue.

All that was left, was to sculpt an appropriate ship's deck for the base, and make some coins to hide the angle of the base of the chest, as it was sculpted by be slightly buried in the sand. After covering the slot in the base with some tape, which I secured with some super glue, I filled in the base's recess with Greenstuff. Then I made some deep grooves between the planks with my sculpting tool. This was followed by some very fine lines in the planks using an Exacto blade.

The gold coins are simply a "snake" made by rolling out some Greenstuff. When this had cured, I simply cut slices off, and glued them in a pile around the treasure chest. One thing I learned from this first attempt at making coins, is that they should be sliced very, very thin. Learn from my mistakes people;)!

To paint the planks, and make then a slightly different tone from the chest, I started with a solid coat of Battlefield Brown. The planks were given a coat of Idrian Flesh, and then a heavy layer of the wash mix. The woodgrain is picked out with a layer of pure Idrian Flesh, and then a 2-1 mix of Idrian flesh and Underbelly blue. The final highlight is pure Underbelly Blue, which was then toned down with a thinned layer of the wash mix.


Finally, I painted all the gold coins in the same way I painted the gold on his armor, but went a lot heavier on the wash.

That's it. Simple, right? Right?

I had a lot of fun painting my first pirate, and experimenting with using the wash mix, and highlights with Underbelly Blue, to really tie all the colors together.

I hope you have enjoyed reading this, and found a few ideas to try out for yourself. Happy painting!

Cheers,
 JAH


Friday, December 27, 2013

Captain Bartolo Montador aka Broadsides Bart

Hey everybody.

I hope you all had a wonderful Christmas, and got some new toy soldiers to paint.

So, to continue catching up, after I finished Tycho I was contacted by the organizer of the Clash for a Cure. The Clash for a Cure is a Warmachine and Hordes charity tournament, raising money for Cancer Research. They also do an auction for minis painted by some of the top painters around the world. I was honored to be invited to contribute for the 2012 event. This was my first piece for charity.

It was nice to be able to choose which mini I would paint, a rare event in professional painting. I was a fan of all the Warmachine Pirates from the moment they were released. I own most of them, but as with most other commission painters, I rarely ever get to paint anything from my own collection, which covers over 25 years of collecting.

I happened to have Bart sitting in one of my figure cases, all ready to go. Having never painted a pirate before, I was very excited about tackling this guy. Purple is also a color that I have hardly ever used, so that would be a fun experiment. I tried to add a little more texture than usual to this guy and this was my first time sculptng wood planks.

I will do the write-up for the colors and ideas next week. Until then, enjoy the photos and cast your vote.

http://www.coolminiornot.com/313755


Thanks for looking. I hope you like him.

Cheers,
 JAH

Friday, December 6, 2013

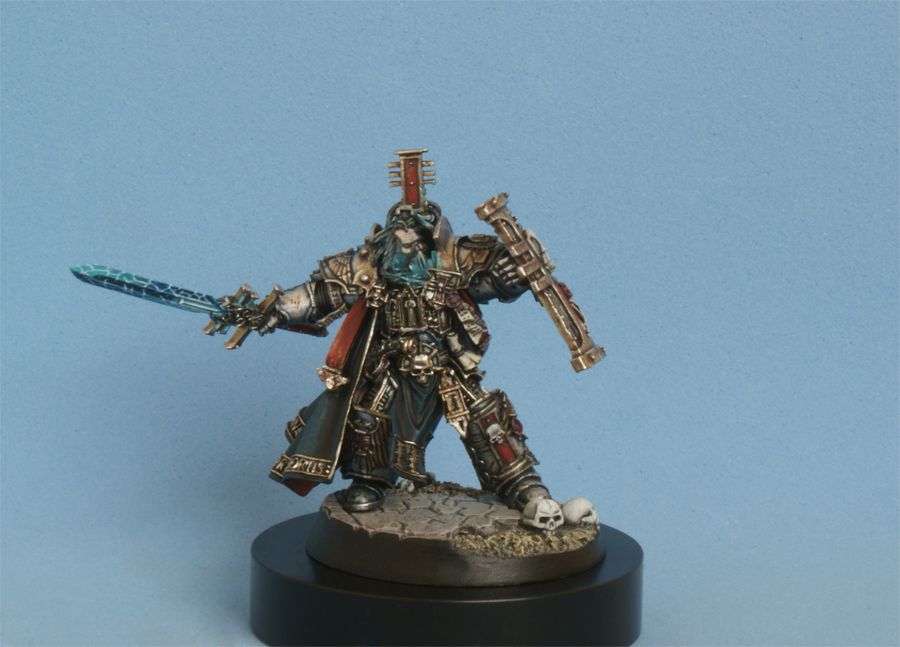
Blood Angels Death Company Captain Tycho

Hello everyone.

This post has been a long time coming. In fact, it has been about a year and a half since I finished painting my version of Death Company Tycho. It should be interesting to look back on a paint job, so long after, and explore what I was thinking back then, and how I took a step up a level in my painting with this mini.

Hopefully you all will agree that this is my best piece to date, and maybe even the best mini I've ever built and painted.


Two posts down, you can see the unpainted pics, and read about the build. Once I had the mock-up finished, I broke it down into the parts I would paint separately. The Ork was painted, along with the base, as one piece. Tycho was painted in a few different pieces, the body, the head, the Combi-Melta, both arms, and the backpack. Usually, my minis are painted in 5-10 pieces, and I don't know what the whole mini will look like until I've already finished the paint job. It all works in my head, somehow, but you do have to keep your light source in mind while working on all the separate pieces.

As always, most of my colors are P3 paints. I'm a huge fan of their slightly satin finish, and I feel it makes my minis bright, even though I always paint over a black undercoat.

Even though Tycho is black, painted over a black primer, I need the greys to be bright enough to show the battle damage. I wanted Tycho to look battered, but strong.

Painting started with the black armor. Once I had a solid base of Thamar Black, I started laying out my highlights with Coal Black. This has a nice blue tone that is not too strong. It shows enough to see how the highlights will look, but not too much that it takes work to paint over if you make a mistake.

Once I worked out where my highlights would be, with the sun directly overhead, I took a big jump in color. Normally I would have started with some Greatcoat Grey, maybe even mixing it with some Coal Black, and built up some gradual highlights. In this case, I knew that the highlights were going to be bright, so I jumped straight to Ironhull Grey. This looked really stark at first, but I came back over it with some washes of Armor Wash and  Flesh Wash, both of which give a nice purple-ish sheen to the black, and tone down the Ironhull Grey. The next layer is Cryx Bane Highlight, followed by Trollblood Highlight for my edge highlight, both given thin glazes of my wash to tone the colors down a bit. This gave me some good sharp highlights, and a surface to paint some battle damage onto. The battle damage is just dots of Thamar Black, highlighted with Trollblood Highlight.


Any of the soft armor bits are given a layer of Greatcoat Grey, Ironhull Grey, and finished with Trollblood Highlight.

I know the description sounds really simple, but I try to keep everything very simple. The trick is just in playing with the contrast to attract the eye. Keep the light source in mind, and bring it to life. No fancy techniques, just lots of thin layers to bring the idea to life.

The head was an important part of the paint job, but once again, I keep it very simple. My normal skin recipe is to start with a dark brown, Battlefield Brown. The first solid layer is Khardic Flesh, followed by some thinned Flesh Wash. The proper layering starts with Midlund Flesh, leaving the washed shadows showing, then a layer of Midlund Flesh mixed 1-1 with Ryn Flesh. The highlights start with Pure Ryn Flesh, and finish with Ryn Flesh and Morrow White mixed 1-1.

The hair is done in the same colors as the rest of the yellow, with a slight variation on the Ork armor. Once again, I started with Battlefield Brown. The next layer is Bootstrap Leather, and then another solid layer of Rucksack Tan. The strands of hair are laid down with a 1-1 mix of Rucksack Tan and Jack Bone, a layer of 1-1 Jack Bone and Cygnus Yellow, then a layer of the same but a 1-3 mix, and finished with a 1-3 mix of Cygnus Yellow and Morrow White.


The Ork armor uses the same mix as Tycho's hair, but has been glazed with Bloodstone between each layer to give a bit of a dirty look. The battle damage is just spots of Greatcoat e Grey, highlighted with the 1-3  yellow and white mix.

The Ork's horns, Tycho's name banner on his shoulder, and all of the purity seals, are painted the same. Starting with Battlefield Brown again, followed by a solid layer of Gun Corps Brown. The next layer is Hammerfall Khaki, leaving the darker brown in the folds and shadows. The highlights start with Menoth White Base, then Menoth White Highlight, and finished with a fine touch of Morrow White. Freehands are done with thinned Thamar Black.

The golds on Tycho are done in my standard recipe. The base is Battlefield Brown. I use it as the starting point for a lot of colors, as it covers so well, and so easily, over black, and is also easy to paint over. The first layer is Rhulic Gold mixed 1-1 with Battlefield Brown, and then a layer of pure Rhulic Gold. Then I start to wash some interesting tones into the gold. I use a mix of Flesh Wash and Sanguine Base to add a red tone to the golds. This also gives me my shadows. I clean up the wash with pure Rhulic again, and then start hichlighting with a 1-1 mix of Rhulic Gold and Vallejo Air Gold.  The next highlight is 1-1 Vallejo Air Gold and Vallejo Air Aluminium, finished with pure Aluminium.

The steel, both on the Ork and Tycho, have been done with another standard recipe. I start with Pig Iron, and then a heavy coat of Armor Wash. Once cleaned up with Pig Iron, I lay down some Cold Steel.Highlights start with Cold Steel mixed 1-1 with Vallejo Air Aluminium. I play around with the washes, using some Beaten Purple, some Flesh Wash, and even some Vallejo Smoke and Bloodstone on the Ork. Highlights and scratches are pure Aluminium.

The Ork leathers are Battlefield Brown, highlighted with Bootstrap Leather, then a 1-1 mix of Bootstrap Leather and Hammerfall Khaki. This was then washed with the Vallejo Smoke.

The Ork's black clothes are Thamar Black, highlighted with a layer of Coal Black, a layer of Greatcoat Grey, and then a layer of Cryx Bane Highlight. This was then washed with Bloodstone to make everything look worn and dirty.

The Ork's skin was a nice experiment, that actually worked out well. I started with a nice solid base of Thornwood Green. Then I began defining the muscles with pure Traitor Green. The shadows are an equal mix of Sanguine Base and Thornwood Green. Final highlights are a 2-1 mix of Traitor Green and Ordic Olive, followed by a layer of pure Thrall Flesh. I finished with a few light washes of Beaten Purple, followed by a bit of Thornwood Green in the deep spots.

The flames painted on the Ork's gun and helmet are just Thamar Black, While the red bits are painted the same as Tycho (see below).


The reds are begun, as always, with Battlefield Brown. Next is a layer of Sanguine base, followed by a layerof Skorne Red. This shaded with a wash of an equal mix of Sanguine Base and Exile Blue. The highlights start with pure Khador Red Base, then KRB plus Menoth White Highlight at 2-1, and finished with pure Heartfire. Everything is tied together at the end with a few glazes of Red Ink. 

The white feathers are based with Greatcoat Grey. I built up the layers starting with a 1-1 mix of Greatcoat Grey and Underbelly Blue, and then pure Underbelly Blue. Next came an equal mix of Underbelly Blue and Morrow White, and finished with a thin layer of pure Morrow White.The tips are just standard black, like the armor.

Finally, the base. Quite a standard urban stone recipe for me. The first layer is Greatcoat Grey, followed by a heavy drybrush of Cryx Bane Highlight. The first wash is thinned Beaten Purple, and then a second thinner wash of Thamar Black. This is highlighted with a heavy drybrush of Trollblood Highlight, and then another light drybrush of Trollblood Highlight mixed 1-1 with Menoth White Highlight. One last Beaten Purple wash, and then a final light drybrush of Trollblood Highlight and Morrow White mixed 1-1.

The skull is painted the same as the base, but without the purple washes. 

That should be everything. I understand that a description of the colors doesn't help a great deal, but I think that everyone paints with a different approach and technique. I can't really describe my process, since it is all experimentation, but I can share the recipe. I hope you find it somewhat useful.

Thanks for taking the time to read this, and for following my work.

Cheers,
 JAH


Tuesday, November 26, 2013

Hey everybody, I'm back!

After a few blown laptops, I seem to have a working one again. Now it's time to get back to showing my painted minis, and telling you all what paints I used to get them done.

Her are a few teases, to show you what I have been up to over the last two years. Sorry it took so long to get back to this blog.


The write-up on Death Company Tycho will be up soon. Stay tuned:).

Cheers
 JAH

Friday, August 5, 2011

Death Company Tycho conversion.

Hello.


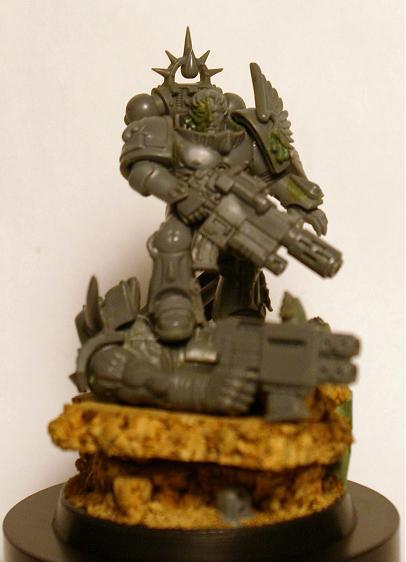
This is my version of Death Company Tycho. I was commissioned to build and paint this guy to be a replica of the Codex artwork for Tycho's entry in the Blood Angels book. The drawing is in black and white in the book, and Tycho is standing on a dead Chaos Marine. This didn't jive with the fluff for the iconic image of Tycho alongside the Death Company on Armaggedon. A little research dug up the original color version of the artwork, where Tycho is indeed in his traditonal gold armor.

I built the original version as a mock-up, with Tycho standing on the Chaos Marine, and as soon as I posted it online, there uproar began. "DC Tycho has to standing be on an Ork!", the masses shouted, and they were right. Luckily, I happened to have a plastic Nob from the Boys box handy. I think V2 of the base is certainly more iconic, and includes a little skull with a bullet hole in the forehead from the Black Reach Termies, because every GW mini needs a skull on the base;).

For Tycho himself, I kept the build pretty simple, as the latest Blood Angel kits are beautiful. The arms, legs, head, right shoulder pad, and the front of the torso are all from the Sanguinary Guard.  The backpack, wing icon, left shoulder pad, and the back of the torso are from the Death Company box. The gun is from the Commander box. I think the cloth hanging from his right shoulder pad is from the Command Squad box, but it may be from the Termie box. The final little addition was an extra purity seal on the left leg. The Tycho in the artwork is a little more ornate, but since I knew this mini would see time in my client's army I wanted him to be a bit more rugged so parts don't fall of if you pick him up.

As far as converting and sculpting, I only had to cut a few parts away, like the Blade Encarmine from the right hand and the Angelus Boltgun from the left. I cut the big blood drop off of the wing icon so that I could sculpt the three blood drops for Tycho's Third Company badge, and used the big blood drop to cover the spot where I had cut the boltgun off. I cut the Sanguinary Guard legs at the right hip to get my pose, and then sculpted a bit of armor to cover the gap. Lastly I sculpted Tycho's mask, using two little bits of paper clip for the pipes coming out of the side instead of trying to get Greenstuff to stay put.

The base is pretty simple. Sand and cork board, done at the right angle to make sense of Tycho's pose. The Nob is built straight out of the box, with a bit of tread on his boots done by rolling the handle of my Exacto to make a pattern in the Greenstuff. Any excess that had gotten pushed beyond the boot sole was allowed to cure and then trimmed off. Viola, one easy boot tread. Well, two actually:).

The greenstuff rim around the back of the base is there to stop the rubble slab from looking like a random pile to strike a pose on. I've seen it done on minis before, and I always found it stops the eye, and lends an illusion of a scene existing beyond the base. We'll see how it works out.

Now it is time to get painting. I have Tycho's finished look pretty much figured out in my head. I'm not sure how I will paint the Ork. The trick will be to paint him in a subtle way, so that he doesn't dominate Tycho, who will be black, with a touch of red, gold, and white. It will be a challenge for my color selection skills, and a new aspect of composition to tackle, since this is the first time I've painted two minis interacting together. Wish me luck.

Thanks for looking.

Cheers
 JAH

Wednesday, June 29, 2011

Tyrant Xerxis

Hello.

Well, it has only been about 10 months since my last post! Some of you may have thought I died, or gave up painting, neither of which are true. Last September my girlfriend and I bought a surf shop in Sayulita Mexico, and moved down here to live the good life in a tropical paradise. It has been a long hard road to get adjusted to our new lives, but things could not be better with the business, and I am finally back at the painting table refreshed and on a mission.

This latest commission has been a long time coming, but is finally done and dusted. The tyrant Xerxis has been a favorite of mine since he was released by Privateer Press years ago. I am stoked I finally got a chance to paint him, and it was good to get to use another one of Wil Davies' excellent Voodooworx display bases.

I hope you like the finished product:


The full 360 can be found here:

http://www.coolminiornot.com/279686

Close-up shots are here:

http://www.coolminiornot.com/280286

I am often asked why I don't post WIP's of my work so people don't have to wait so long for the finished pics of my latest commission. The main reason is that I hate photography. I've never been a big fan of technology, and resisted buying a camera and laptop until just 3 years ago. Of course, since I took the leap I am now in whole hog, and could not imagine going without my internet, and am currently having a not so secret love affair with my ipad.

The other big reason is that I am always experimenting and pushing my skills with each new commission. Basically, what this means to me is that I feel like I don't actually know what I am doing, and the finished piece is the end result of a lot of trial and error. Every step looks like shit to me, but it all seems to come together in the end. It just takes a lot more hard work to get there than it should. Hopefully in a few years I will have fully developed my style and skills to a place where I am finally comfortable and efficient with my painting.

I have also been asked why I only talk about mixes, and not technique. It is easy to describe the colors used, and the ideas behind them. It is much harder to type about how I actually apply the paint and get my results. I think video is the only real way to share the technique with a brush, and there is no way I want to share the struggles and frustration I go through over the weeks I work on a single mini. By the time I am done with a mini I hate it with a passion, and never want to see it again. I am, however, always happy to see that each piece gets better scores on CMON, brings in more commission requests, and shows that I am constantly working beyond my "comfort zone".

Like a lot of painters, I have dreamed of winning a Slayer Sword for years. Since I have never really been a gamer, but have been captivated by the art, stories, and sculptures of the mini world for over 25 years, joining the ranks of the world's elite painters has always been the driving force behind why I pick up the brush. I have a long way to go, as I don't seem to be blessed with a natural talent for painting, by which I mean I struggle with the brush more than just having results unfold easily. So for anyone who has big dreams, but feels like they fail to get the results they want, it is all about hard work. No video tutorial will ever replace hours upon hours of practice.

O.K., glad I got that off my chest. If you are still with me, here are the colors I used to paint the Tyrant.

Once again, I was asked to take the Privateer Press studio scheme and recreate it. Using mostly P3 paints, I got to work.

Since the reds are the dominant part of this mini I started with them first. I wanted a different tone for the armor than I did for the cloth, but both start out the same. Over a black undercoat I started with Sanguine Base on the smooth armor plates and the cloth. Once everything had a nice smooth basecoat, I stated thinking about my light source. I decided that the light would be coming from above, but slightly behind him over his left shoulder, so that I could play with a little bit more dramatic shading and highlighting than just having an overhead lightsource.

For the armour, since I knew I would be painting shadows in, rather than just layering up to my highlights like I used to, I put down a solid coat of Skorne Red. Since this was the basic tone I wanted the armor to be I started shading, keeping the direction of my lightsource in mind. I started with a wash of GW Leviathan Purple. This enriched the red a bit, as well as running into the cracks and seperating the armor plates from the gold trim. Carrying on with the purple tint I mixed S.R. with Gnarls Green 2-1. This almost made Sanguine Base, but slightly more red. I painted this mix in where I wanted my shadows, and then cleaned up the blends with pure S.R. again. Happy with the result, I moved on to highlights. I wanted a gradual transition up until that final stark line at the extreme edges, so I used about six layers of slightly brighter tones. Starting with Khador Red Base I started to build up my highlights, being careful to leave some Skorne Red showing. I gradually worked my way around where I wanted the light to hit using a mix of Khador Red Base mixed with Heartfire, first at 2-1 K.R.B + HF, then 1-1, then 1-2 K.R.B + HF, and finally a 1-4 mix which is quite orange, but somehow more subtle than Khador Red Highlight. The last bit of highlight is more of a stark line to make things "pop" just a bit. This was a straight line of Khador Red Highlight, followed by a streak of H.R.H. and Morrow White at 4-1. Once that was all done I brought it together with a few glazes of Red Ink.


Next I tackled the red cloth. This had already been given a basecoat of Sanguine Base, so I started to build up how I wanted the creases and ridges to be hit with a 2-1 mix of S.B. and Skorne Red. The shadows were done with my 2-1 mix of S.R and Gnarls Green, just like the armor. Happy with the shadows, I moved on to the highlights. Starting with a 2-1 mix of S.R and S.B., through a 4-1 mix, and then pure S.R. layer. Next came a pure layer of Khador Red Base, careful to keep the paint thin enough to blend over the S.R. layer. Then came a layer of K.R.B. and Heartfire at 2-1. At this point, everything was basically the same tone as most of the work I did on the armor. Where I switched it up was on the final highlight, which was K.R.B. mixed with Menoth White Highlight. This gave a slightly pink color, which was toned down with a few thin layers of Red Ink.


Having painted the red flags in his back, it was time to move on to the giant bone horns/claws (?) sticking out the front. I started with a standard coat of Battlefield Brown. This was basically completely covered with a layer of Gun Corps Brown, except for some of the deep ridges along the base of the horns. Then came a layer of Hammerfall Khaki, being midfull to leave some G.K.B. as a shade under the curves at the tips to reinforce the lightsource. Covering slightly less space from the base toward the tips, came a layer of Jack Bone, then Menoth White Base, then Menoth White Highlight, and finally a bit of Morrow White. Easy peazy, but the shadow under the tips of the horns really makes it work for me since when viewed from the front it really sells the direction of the light.

Before I did the gold on the helmet, I painted Xerxis' face. Since the studio Skorne have a very unique skintone I started with Rucksack Tan as my base. To keep with the slightly purple tones in the shadows of the reds I shaded his face with a wash I made from Skorne Red and Thronwood Green in equal parts. After a little clean-up with the Rucksack Tan again I moved on to the highlights. The first layer was a 2-1 mix of R.T. and Menoth White Highlight, followed by a 1-1 layer, a 1-2 layer, a 1-4 layer, and finally pure M.W.H., gradually hitting less and less of the face except where the light would fall. The eyes where painted with pure Thamar Black, and given a white dot as a highlight, since I like the look of the glassy black alien eyes that the studio Skorne have. His lips where given a thin layer of Beaten Purple after I had picked out the teeth with a coat of Menoth White Base followed by pure Morrow White.

Now I was ready to do the gold, which is a big part of this mini. First came, as always, a layer of Battlefield Brown, then a very solid layer of Rhulic Gold. To tie in with the purple tones of the overall scheme I shaded the gold with a heavy layer of Flesh Wash(P3's version has a very purple tone). I started to highlight with  a 2-1 mix of my R.G. and Vallejo Model Air Gold. I am finally starting to get the hang of working with this very dominant gold paint. I feel the it really needs to be mixed down for the main tones as it is such a strong color. I still found my mix a bit bright, and gave it a liberal wash of GW Leviathan Purple. The highlights continued through a mix of R.G. and V.G. at 2-1, then pure V.G., and finished with a fine highlight of pure Vallejo Air Aluminium. Not very complicated, but man was there a lot of gold to paint.


There was still a bit more gold to paint in the form of the textured plates on the armor and maces. This was a much easier process since I just gave them a coat of the Vallejo Air Gold, followed by a wash of Red Ink, and then little stipple of the pure gold again.

Next up where the black bits. He has black cloth, armor bits, and gems, but they are so small that I painted them all with the same mixes, instead of trying to get different tones like I did with the reds. I started with pure Thamar Black, and a initial highlight of pure Coal Black. This was followed by two layers of C.B. and Underbelly Blue, first at 4-1 and then at 2-1. This was toned down with a very thin wash of pure Thamar Black, and then the final highlight was lightly done with pure Trollblood Highlight.

I finished by painting the steel of Xerxis' maces. I wanted to try for a heavily shaded "Demi-Metallic" look, so after a basecoat of Pig Iron I put down a heavy coat of Armor Wash. This was cleaned up with P.I. again, and then given an initial highlight of GW Boltgun Metal. To tie in with the rest of the mini, and maybe give the impression of a magical weapon, i used the GW Leviathan Purple wash again. The final highlight was Vallejo Air Aluminium.

With the mini done, it was on to the base. This is another great resin display base from VoodooworxUK. Some people have said that the base is too tall, leaving way too much black space to distract the eye away from the mini. I agree, this base could have been half as tall, but the sculpted detail on top is great. Very nice stone work.

To continue the colors I used on the mini I started with a basecoat of Rucksack Tan. All the cracks and crevices where given a heavy wash of GW Gryphonne Sepia, and then cleaned up with R.T. again. At this point I was note happy with the tone of the base, so I covered all the R.T. with a 1-1 mix of R.T. and Menoth White Base. I still didn't like the color, so I tried pure M.W.B. to see if that would do the trick. It didn't. The lack of texture and contrast was uninteresting. The solution was to shade with a wash of Bloodstone instead of sepia, as the Bloodstone is a very red-brown and matched the mini better, as well as being a richer tone. then for texture I used a piece of foam from a blister pack to stipple alternating layers of Bloodstone, Menoth White Base, and Menoth White Highlight. That did the trick. For the exposed Stone under the stippled bits I wanted a different tone, so I just washed my M.W.B. layer with Bloodstone, and then hit the edges with M.W.H. and got the result I wanted. The dirt was drybrushed with the same series of colours, but in the traditional dark to light manner. A couple coats of black around the edges of the base finished everything off, and he was ready to be shipped to his  happy new owner.

Thanks for having taken the time to read this. I hope that some of you found this write-up helpful.

I'm off to finish my next project, a plastic version of the Blood Angels Commander Dante, where I am experimenting with shading my gold using Sanguine Base.

Cheers
 JAH

Tuesday, August 17, 2010

The Butcher of Khardov

Hello.

Here is my latest commission piece. This is my first proper display mini. Everything I've ever painted before has been on a legal gaming base. It was nice to place something on a bigger, more detailed base. The one I chose to use is a resin plinth base from Voodooworx UK, a new company that is the brainchild of Wil Davies (a very good UK painter). I have a few more that I will be using, and I'm very happy with all his designs.

My brief for this job was to take the studio paint scheme, and make it better. Not an easy task!

The full 360 view of the close-ups is on Coolmini here:

http://coolminiornot.com/257412

Some full view shots are on this page:

http://coolminiornot.com/257232

Now on to a couple of pics, and the breakdown of how I painted this psychopath.


To start, since the customer wanted a version of the studio scheme, I bought the Khador army book. The painting section of the book is very well done, with very clear step-by-step pics. All I had to do was build on their work.

As usual, I started over a Black undercoat. I like to lay down a basecoat of Sanguine Base when I'm doing Reds. It covers well with two coats, and is a great color to build off of. Normally I would start mixing Khador Red Base into my SB, and slowly start building up lighter layers of color, but I changed my approach for this guy. Since I knew that I would be shading with a deep Blue tone, I just skipped straight to an overall layer of KRB. With a nice solid base of Red to work from, I started adding shadows and highlights.

I came back in with the SB to establish where the shadows would be, and then made a mix of 1-1 SB and Exile Blue. This made a nice Purple tone for shading. For the first set of highlights i went straight to Khador Red Highlight. it's a bit of a jump from the Red to the Orange, but it would all be tied together with some Red Ink glazes at the end. The final edge highlights were a 1-1 mix of KRH and Menoth White Highlight. This made a nice peach color, that would be toned down with the glazes after I painted on the battle damage.

The battle damage is hand painted, with the very tip of my brush. First I painted the chips on with Thamar Black, concentrating mainly on the edges, which would be doing the most bashing in a hand to hand fight. I made sure to get the elbow, knee, and toe armor pretty dinged up, so it looked like he would use these parts of his body when in close. The belly and groin plates where hit with spots that look like he's had a few bullets bounce off as he wades in. The middle of each black spot was given a dot of Greatcoat Grey to add a bit of dimension, and the edges where highlighted with my KRH/MWH mix to match the Red highlights.

The armor was finished off by about ten layers of Red glaze. This is a mix of water and Red Ink, diluted about 15-1. It takes about five layers before you start to see a change, and then it just gets deeper with each layer, and slowly brings all the colors together.

Next I painted his leather pants. They were based with Battlefield Brown, then shaded with pure Thamar Black. Normally I would start mixing in Gun Corps Brown for the highlights, but I wanted to do something a little different, and go for a Red tone. I mixed some Bloodstone into the BB, and just played around until I had a look that I liked. I think I used a ratio of about 1-1.

For the boots, I wanted a different tone completely, so I started with a 1-1 mix of Battlefield Brown and Thamar black. I started highlighting with pure BB, and then finished off the folds and edges with some very thin Gun Corps Brown. To match the chips on the toe armor, I scuffed the boot toes with some Hammerfall Khaki, using a crosshatch pattern.

The coat is done using the instructions in the army book. The first layer is pure Thornwood Green. This is washed with a 1-1 mix of Cryx Bane Base and Battlefield Brown. Then the darkest shadows are painted in with a mix of Umbral Umber and Gnarls Green. I don't actually have the Umber, so I just made some using a 1-1 mix of Thamar Black and BB. The first highlights are a 1-1 mix of Thornwood Green and Traitor Green. The final highlight was this mix with  1-1 mix of Cryx Bane Highlight and Thrall Flesh added in. The I came back with my Umber mix, and nicked up the edges of the coat a little.

Now it was time to tackle the metals. As usual, my steel bits were basecoated with Pig Iron. This was shaded with a mix of Armour Wash, Coal Black, and Exile Blue. I used this wash a few times throughout the different stages, so just play around with a mix until you get something you like. It should have a blue tone, which compliments the blue tone in the red armor's shadows. A layer of GW Boltgun metals is used for the first highlight, followed by a wash of Vallejo Smoke to add a bit of Age to the steel. The final highlight is Vallejo Air Aluminium, which really pops.

The heaviest use of the Vallejo Smoke is on the metal plates around his coat, which I felt would be the dritiest, and most worn metal parts.

The bronze areas are first covered with Battlefield Brown, which makes a nicer base for Golds, Coppers, and Bronzes than Black does. A mix of my vintage 90's Dwarf Bronze and BB, at about 1-1, is used for the basecoat. Pure Dwarf Bronze come next. This is shaded with PP Flesh Wash, which has a nice pruple undertone. For the heavy shading I used my Umber mix. For the highlights I mixed my DB with some VA Aluminium. This is washed with GW Ogryn Flesh Wash to keep the Red/Blue/Purple tones coherent through the whole mini. One final layer of the highlight color finishes everything of.

The blood was stippled on in a few layers. First I used Sanguine base to lay out where i wanted the blood to go. It was the stipple with some Skorne Red, foloowed by Khador Red Base, and then finally some SB mixed with a spot of Black to tone it all down a little, and make it a little more gory.

I did the simple wood grain pattern on the shotgun with a base of Battlefield Brown. Then I painted fine lines of Thamar Black, and highlighted my BB lines with pure Gun Corps Brown. Simple, but effective.

The leather holster, belt, and front straps were done with the same exact colors as the wood, just with Gun Corps Brown as the dominant color.

Next I painted the Black bits. The first highlight was pure Coal black. The next was a 1-1 mix of CB and Underbelly Blue. The final highlight was a 1-2 mix of CB and UB.

For the fur, I wanted to try something new. I didn't want to just have White fur with Grey shadows. I wanted to liven it up a bit. I started with a basecoat of Greatcoat Grey, which has a nice blue tone to it. Everything but the deep shadows were then given a coat of pure Trollblood Base. At this point, the fur was basically turquoise, and I thought I was crazy. Then I started mixing in Some Trollblood Highlight at 1-2, and had a nice color to work with. Next I picked out every tuft with pure TH. A light wash of TB later, and there was some nice contrast and interesting tones goin' on. A final overall highlight with 1-1 TH and Morrow White did the job. This was finished with some pure White to reinforce the overhead lighting.

Now I was ready to paint the head. First coat, as always is some Battlefield Brown, followed by Khardic Flesh. The first highlights of Midlund Flesh were painted, and then two seperate washes were added. The first was Thornwood Green, and the second was Skorne Red. At this point, I was following the book, but the customer wanted a Red face, that looked like he was workin' hard. I highlighted all the way up to Ryn Flesh, and then came back with some very thin glazes of Skorne Red to tint the face.

The stubble on his head is a 1-1 mix of Greatcoat Grey and Khardic Flesh. The teeth are Menoth White Highlight, the tongue is Sanguine Highlight, and the eyes are MWH with a Black dot.

The Kommander rank badge on his chest was freehanded on with Heartfire, followed by Cygnus yellow, and finished with a 1-1 mix of CY and White. Any little mistakes were cleaned up with Skorne Red, which also provided a bit of an outline. It's a tiny space though!

Finally, the customer wanted a furnace glow in his boiler. It was done with progressive layers, starting with Sanguine Base, followed by Skorne Red, Khador Red Base, Heartfire, Cygnus Yellow, 1-1 CY and White, and finished with pure White in the grill. I stopped at CY on the exhausts, so the light looked deeper down, and then hit them with mu Umber mix for a bit of soot around the pipes.

That's about it. I hope that this has answered any questions about what colors I used.

Thanks for taking the time to read this.

I'm off to start the next job now, the Tyrant Xerxis!

Cheers
 JAH

Saturday, July 17, 2010

Heralds of Light Space Marine Captain

Hello.

Today I would like to talk about painting my latest finished commission mini. Sadly, I'm not nearly as good with the camera as I would like to be, but my rubbish pics will have to do.

A lot of people seem to struggle with painting White. I am still learning a lot of lessons with each new paintjob, but I don't find White to be any more difficult than any other color. The most important thing that I have learned about painting is patience. It takes patience to apply all the smooth, thin, layers to get a nice solid color, and to make all the mixes that give the smooth transition from dark to light. It also takes patience to wait for a layer to dry fully, so you can see what the color actually looks like (since colors dry a little different from how they go on wet).

Enough rambling. On to the pics, and then the build/paint write-up.


The Heralds of Light is a Space Marine Chapter that was created by  a guy (Codex Grey) over on the Bolter and Chainsword forums. The idea is that, although there is a Chapter symbol, each Company has a unique set of Heraldry. In this case the Chapter symbol is on the right kneepad (the star), and the Company symbol  (the flaming tower) is on the shield and shoulderpad. 

When I was asked to do this job, the first thing the customer specified was that he wanted the Captain to be armed with a Power Sword and a Stormshield. He wanted to use the Warhammer Fantasy Empire shield, and he wanted the tower and flame symbol sculpted on.

After drawing up a few sketches of different tower and flame options, we settled on a design. I had originally planned on sculpting the stonework and flame, but when I got started, I realized that I can paint much finer detail than I can sculpt. I'm not much of a sculptor yet, as this is only my second attempt at anything beyond filling gaps, so I just sculpted on two flat towers, and would come in and paint the rest of the details freehand.

I chose to use the Bionic Arm that wields a Chainsword from the Captain kit. The guard on the hand seemed to make a nice base as a grip for the shield. After gluing the shield to the hand, I sculpted a few powerlines for the Stormshield on the inside, to give a bit of a Sci-Fi element, and glued a Purity Seal on, further reinforcing the 40K element.

The shoulder pad that I chose to sculpt the tower onto is from the new Blood Angels. It already had a purity seal on it, but it was designed for an arm the is hanging down. Since this guy's arm would be horizontal, instead of vertical, I had to cut the parchment off and sculpt one that is hanging more naturally. This was my first time trying to sculpt any flowing paper, and was a bit of a scary prospect. In the end, I'm happy with the result, even if it is a bit big;).

After all was said and done, here is the arm I ended up with.


The Sword was one I had left over from cutting a Sanguinary Guard arm up for a Death Company Tycho sculpt I will be working on next month. It's fuckin' huge! Nobody seems to mind that this guy is wielding a sword as big as himself with one hand, so it's all good.

Everything else is just a straight build using the Space Marine Commander kit. The entire mini is plastic, or Greenstuff, and he sits on a resin base from Dragonforge Design. He's as light as a feather!

Now that I had built him, it was time to slap some paint on. The color scheme had, for the most part, already been worked out, so I dove right in. Unless I'm working with glazes I like to start from a Black undercoat. Since this guy had a lot of metals and dark Blues, I only had to worry about how to build up a nice White over the Black. P3 paints have some wonderful coverage, I wasn't too worried.

To start, I painted all of the armour Greatcoat Grey. This is one of my favorite P3 colors, and covers Black easily. Next I painted everything Ironhull Grey, being careful to leave the Greatcoat Grey in the cracks to act as my liner. From there I started to slowly build up my White by mixing Morrow White with my IG. After each layer was complete, and dry, I would add more White to the mix, until I worked up to pure White. The ratios were 1-1 MW and IG, then 4-1 MW and IG, then 6-1 MW and IG, then 12-1 MW and IG, and finally pure White. By building up each layer slowly, and using thin paint, I achieved a smooth White with no chalkiness or half-ass coverage. Usually the first layer of each new color would have a little of the last one showing through, and look a bit patchy. Two coats of each mix did the job though.

The main thing that I learned painting this White is that the lighter each successive layer got, the darker my previous layer looked in comparison. My Greatcoat Grey now looks like Black in the cracks, and my pure Ironhull Grey shadows looked way too dark as well. I had to fiddle with things a bit, and ended up using my 4-1 mix as my main shadow color. It was still a bit stark in places, so I gave the shadows a fine glaze of 6-1 mix to help the transitions a bit. It really is amazing how light colors make your darks looks so much darker. This was a learning experience to be sure.

The Golds are my standard recipe. The first layer over Black is always Battlefield Brown. This is an easier color for the Gold to cover, and keeps me from having to lay on the Gold too thick. Next is a solid layer of Rhulic Gold. This was covered completely with a mix of Rhulic Gold and Vallejo Air Gold in a 2-1 ratio. Vallejo Air Gold is a very strong color, but I like the way the Rhulic tones it down a bit. Next came a wash, to shade, with P3 Flesh Wash, which has a nice Purpleish hue that I like my Golds to have. The first highlight is pure VAG, and the final highlight is pure Vallejo Air Aluminium.

The Blacks are all done with my standard recipe. First a layer of Coal Black to establish where I want the light to reflect. Then  a layer of Greatcoat Grey, and then a layer of GG and Trollblood Highlight mixed 1-1. Simple.

Soft armor joints are done the exact same way, but I skip the Coal Black step, as it won't  show up anyway.

For the Blues, I knew I wanted to have a few variations in tone. The leathers would be the darkest, with the tassles being the lightest, and the cloak somewhere in the middle. I started with a layer of Exile Blue on everything. Next came a layer of Cygnar Blue base, followed by a layer of Cygnar Blue Highlight. I used both of these colors only on the raised edges of the leathers so they would retain a very dark look. The cloak and tassles got broader coverage with these colors to brighten them up a bit more. Next I painted the edges of the cloak and the tassles with a 1-1 mix of the CBH and White. The tassles were then given a final highlight of White and CBH at a 2-1 ratio.

When it came time to paint the towers, I wanted to experiment with the sponge stippling technique a bit. I started with a solid coat of Greatcoat Grey, and then stippled a 1-1 mix of GG and Trollblood Highlight. This was hit again with a pure layer of TH. This gave a nice textured stonework effect. Then I painted fine lines of GG to create the stone blocks. The windows were painted in with Black, to give them more depth that the stone block lines. Finally, each block was highlighted with pure White to complete the 3-D illusion.

The glowing eyes, flames, gems, and power effects were all painted with Arcane Blue. To start I mixed a color with a 2-1 ratio of AB and Coal Black. This created a nice color for covering Black, but wasn't too harsh of a jump in tone. Next came pure AB, followed by a mix of AB and White. I don't remember the exact ratios, but it was definitely heavier on the White. I just played around until I had a look that I liked. I'm still new to any kind of OSL effects, so it was fun to experiment. I will definitely be playing around with this effect more in the future.

The freehand Chapter symbol, and the eagle design on the back of the cloak, were done with the same mixes that I used for the White armor, but I stopped at the 6-1 ratio, instead of going up to pure White.

The Purity Seals are done with my standard recipes. The seals are based with Sanguine Base. While the parchment is based with Battlefield Brown. The seals are given a coat of Sanguine Highlight, being careful to leave the SB showing in the deepest recesses. They are finished off with a highlight of SH mixed 1-1 with Menoth White Highlight. The parchments are worked up through Gun Corps Brown to MWH, and the very edges highlighted with pure White. The text is done with scribbles of thinned Black.

Finally, for the base I wanted to play with the sponge some more. I layed down a basecoat of Bloodstone, and started washing it with multiple layers of GW's Ogryn Flesh wash. Then I started mixing Jack Bone with the Bloodstone and sponged that on. I alternated between adding more JB to the mix, and washing over each layer with the OF to bring it all together. The effect was a bit subtle for the camera, but has a nice stone texture to the naked eye. Definitely a technique I will use again.


I tried a lot of new stuff on this guy, and learned a lot throughout the process. Now it's time to take the lessons learned, and apply them to my next commission.

I hope that you have found this write-up useful, and that it will push you to try new things as well.

Thanks for looking.

Cheers
 JAH


Wednesday, July 14, 2010

What the hell happened to June?!?

Well, everything I touched turned to shit last month.

My plastic Commander Dante Mini, that I was painting for ebay, decided to assault the vacuum cleaner, and lost. He will live to fight another day, after some minor repairs, and hopefully see the light of day by the end of the month.

Everything I tried on June's commission mini went wrong, at least twice. The heatwave we had here in Portland didn't help with trying to finish off the fine freehand detail, in white. Thanks Mr. Sun. Jerk.

I pushed on, and finally finished him. The customer is very happy, so I can't complain.

I will have a painting write-up for him in a couple days. Until then, here's a little teaser, and the voting link.

Enjoy.

http://coolminiornot.com/254853


Thanks for looking.

Cheers
JAH

Wednesday, June 2, 2010

What's on deck for June?

Well, April and May were a disaster. Finishing one mini a month is not a very good way to make a living, even if they do go for a few hundred bucks a piece. This month I will be kickin' the tires, and lightin' the fires, and finish two minis!!! Hahahahaha...

First up I have a plastic Commander Dante model, built from the Sanguinary Guard sprue. I was sent most of the new Blood Angels stuff for free from Wayland Games in England. They were one of the sponsors for the Golden Bolter painting contest over on the Bolter and Chainsword website back in February. They liked my Salamanders Captain so much, they awarded me the random prize. With a pile of boxes and blisters sitting in front of me, I knew I had to put them to some use. The new plastics are a great opportunity to update some of the old Character models. Dante is first, and there will be a plastic version of Death Company Tycho which I have been commissioned to start on next month.

Speaking of free stuff, I'm waiting on a package of samples to come from Red Box Games. Tre Manor has been nice enough to send me some samples of his latest sculpts. This is when being known as a painter in the industry really feels good. To have artists who appreciate my hard work enough to send me free stuff is a wonderful feeling. Small garage companies struggle to get by, yet still have the generosity to hook up their boys. I'm really looking forward to seeing his Goblin Chief riding the Kodiak Grizzly in the flesh. The sculpt looked great, and the detail he fits into his tiny minis is incredible. You're the man Tre!

I am only accepting one commission a month right now, so I don't get swamped, and my customers will not have to wait more than a month to get their finished piece, once the building starts. Right now I am booked for the next three months, which means I have three minis on deck.

This month is a Space marine Captain for a DIY Chapter. Some nice sculpting and conversion work is involved with this job, so it should be a cool one-of-a-kind piece. I really enjoy the interaction between myself and customers, where I suggest the things that I think should be done with the mini, and they tell me what they like, or dislike. It makes for a better product in the end, when you take the time to bounce ideas around, and explore all the options.

Check back next week for the finished Dante, and maybe a few sneak peeks of the sculpting I'm doing on the Captain job.

Thanks for looking.

Cheers
 JAH

Tuesday, May 25, 2010

Custom Grey Knight Grandmaster


Hi. I've completed my latest commission piece. Finally! Painting this 1 guy was like painting 4 single minis. The sheer amount of detail and freehand is out of control. I had to tackle him in 7 seperate pieces before finally assembling the finished product. Here he is, a Grey Knight Grandmaster worthy of the name.


More angles can be seen in my CoolMini gallery, here:

http://coolminiornot.com/251256

I would appreciate your vote on this big guy.

Here's a brief rundown of what went into building this guy.

He started life as Marneus Calgar in Terminator armor. The base, the legs, and the torso are stock parts from his mini. The only parts that come from an actual Grey Knight Terminator is the Psycannon arm, and the Heraldic Shield on that left shoulder. The helmet is the Company Champion head from the Command Squad box. The cencers hanging from his back are from the Dark Angels sprue, and the big purity seals on the halberd are from the Ravenwing sprue. Finally, the Force Halberd is built from a Termie Librarian arm, with the eagle cut off his staff and replaced with a blade from a Menoth Warjack.

There was a little bit of sculpting that had to be done to make everything fit. The shoulder pad rims made for an awkward fit, so some soft armor joints had to be sculpted around the armpits. The ammo feeds at the back had to be cut down, and some sculpting done to blend the cloak up over the holes. All of the Ultra symbols had to have the grooves filled in to turn them into simple discs. The censers had some extra rope sculpted on so they wrap around the chains. Finally, where the eagle was clipped off the end of the staff, I had to sculpt a plug for the cable to meet the halberd head.

It was all very simple stuff, but good practice for me, as this was only the second time I've tried any sculpting. The little extra work goes a long way to making a unique mini.

When it came time to paint this guy, after having made sure all the parts fit, I painted him in 7 parts. The base, the legs, the torso, the helmet, and both arms were tackled seperately. I just had to keep in mind the whole time the different angles that each part was going to be glued at, so I could keep my shadows and highlights coherent.

Once I had carved off the Ultra symbol from the rock, I tackled the base first, as it was the simplest part of the paintjob. Starting from a black basecoat, I painted everything Greatcoat Grey. Next came a heavy drybrush of Trollblood Highlight, followed by the same with Menoth White Highlight. The rock was then given a few good coats of GW Washes, Leviathan Purple and Thrakka Green. When this was dry I hit everything with a light drybrush of Menoth White Highlight again to make the edges pop.

Next I tackled the legs. I had never painted a Grey Knight with metals. The GW scheme uses a wash of Regal Blue to tint the metal. I felt like doing something a little more unique, so I went with a Turquoise tint. I basecoated the metal with Pig Iron, which covers so easily, and is a nice dark tone. Then I used a mix of Armor Wash, Mixing Medium, and water to define all the seperate armor plates. This is pretty sloppy, but the next layer, GW Boltgun Metal, cleaned everything up and defined the shadows. At this stage the armor was bright enough that I was ready to tint it. I mixed some P3 Turquoise Ink with some Mixing Medium and water, and slathered it on. After 2 or 3 layers, I was happy with the result. I came back with the Boltgun Metal again to start defining the highlights. The highlights were finished with the top edges being given a coat of Vallejo Air Aluminium.

I pretty much got my Golds figured on the Blood Angels Sternguard mini I painted last month. Basecoat Battlefield Brown, a layer of Rhulic Gold, a mix of Rhulic and Vallejo Air Gold, a layer of pure VA Gold, a wash of P3 Flesh Wash, and a highlight of VA Aluminium. Simple, and it works great.

The black leather was done with my stock Black technique. A quick coat of Coal Black with the pure Black left in the shadows. First highlight is Greatcoat Grey, followed by a layer of Trollblood Highlight. Good to go.

I think I've got my scroll and purity seal recipe down. I start with a basecoat of Battlefield Brown. Next is a layer of Gun Corps Brown, just leaving the BB in the deepest parts. This was covered with a layer of Menoth White Base, leaving a bit of GCB for light shadows. The Highlight is done with Menoth White Highlight, and the text is done with some watered down Thamar Black.

The wax seals are done with a basecoat of Sanguine Base, followed by a layer of Sanguine Highlight, and finished with SH mixed with Menoth White Highlight.

The shield, or giant beltbuckle as I have come to think of it, was given a basecoat of Sanguine Base on one side and Greatcoat Grey on the other. Some Khador Red Base was mixed in with the SB, and some Trollblood Highlight for the GG. I did a few mixes like this, getting lighter each time, until i was ready for pure KRB and TH. The Red was then given a fine line of Khador Red Highlight.

The Gems were painted with Beaten Purple. BP mixed with a bit of White for the reflection along the underside of the gems, a spot of Black on top, and then an even finer spot of pure White.

The hip pads were basecoated with Sanguine Base, and then mixed with Khador Red Base. Unlike the shield, I wanted these to be a little darker and more maroon, so I didn't mix as much KRB in. I use pure KRB for the edge highlight. I then painted an Inquisitorial "I" in Gold, and did a little filagree around it.

The helmet is basically more of the same. The metal is done just like the legs. I painted the eyes with my reds, but using the gem technique. The earpieces on the helmet are done just like the hip pads, with the "I" freehanded on but no filagree. The golds are the same as above.

Next I tackled the Psycannon arm. Not much worth mentioning here, except for the cables. All other colors are the same as above. The yellow and black cables may look complicated to someone who hasn't tried it yet, or hasn't discovered the easy way to do it. Trying to get a Yellow color over Black would be a nightmare, and trying to paint each yellow stripe would drive you crazy. The simple way is to paint the whole cable Brown first. Once you have a nice solid coat of Gun Corps Brown, it is easy to cover with a Yellow like Heartfire. After I have a nice solid layer of Heartfire I come back in with the black and paint all the stripes. A fineline highlight of Trollblood Highlight, and you're done. Much easier, and very quick.

The shield was done freehand, without a sketch. I just winged it, and prayed for the best. I layed out the shape of the Cherub's body with Khardic Flesh, the wings with Greatcoat Grey, and the Snake with Gnarles Green. Then I cleaned everything up with Black. Everything was brightened up with Midlund Flesh, Trollblood Highlight, and Iosan Green, respectively. The highlights were done with Ryn Flesh, Morrow White, and Necrotite Green, and the hair painted with Cygnus Yellow. The black edges were highlighted as normal.

The Force Halberd was up next. The only thing I did different here was on the blade. A guy had painted a very similar conversion for the Golden Bolter contest, and I liked the fiery sword he painted. Since I usually paint Power Weapons with a Blue glow, I thought I'd try something different here. I started with a basecoat of  Sanguine Base, and then played with Khador Red Base, Heartfire, and Cygnus Yellow. I just did a bunch of different layers of squiggles with these colors until I had an effect I liked, and then highlighted the edges with Cygnus Yellow.

Now it was time to paint the torso and cloak. I had put this off  'til the end because I wasn't sure of the freehand designs I wanted to use. Once I had it all worked out in my head, I dove right in. I wanted a few different looks than normal here on things like the Black side of the cloak and the tassles.

I started the tassles with Sanguine Base as usual, and the layered on Skorne Red for my basic color. I highlighted with Khador Red Base, and then used Khardic Flesh for my fine highlight. I did the same on the tassles across the chest, and on the Force Halberd.

For the Black on the cloak, I used Coal Black for my highlight, and used a fine line of Greatcoat Grey as my fine highlight. I like the darker finish that it has over taking it all the way up to Trollblood Highlight.

The freehand on the back was sketched out with Battlefield Brown, and then given a solid coat of Gun Corps Brown. this was finished off with Cygnus Yellow.

The Red on the front was taken through my normal Red progression, but highlighted with the Khardic Flesh, instead of Khador Red Highlight or Heartfire, to give a softer feel.

The freehand design was worked out on paper first, and then sketched on with Greatcoat Grey. I started from the bottom corners and worked my way up and across so my design would look even all the way around. Once I had it worked out I brightened the lines with 50/50 Greatcoat Grey and Trollblood Highlight. I finished the design with a layer of pure TH.

Once all this was done, I assembled him and was happy to find I didn't really have to do any touch-ups due to the glue. Usually you get a little foggy line where two parts are glued together, but everything was hidden here.

A round of photos later, and this guy was ready for a few coats of Matte Varnish. I use the Vallejo brush-on Matte, as Portland is way too humid to trust a spray.

Now he is off to his happy new owner. Ready to kick ass and take names as the Emperor's strong right hand.

Cheers
 JAH